🔹 What This Guide Covers
When you first move into barracks in Korea, depending on the building and its age, some facilities may show signs of wear over time.
In older barracks, you may occasionally notice minor issues such as buildup, discoloration, or particles in the water.
In these cases, using simple solutions like faucet filters and shower filters can help improve your daily water usage.
The best part is that these products are cheap, easy to find at places like DAISO, and very simple to install—no special tools or experience required.
In this guide, we’ll walk through how to install and use both a faucet filter and a shower filter step by step.
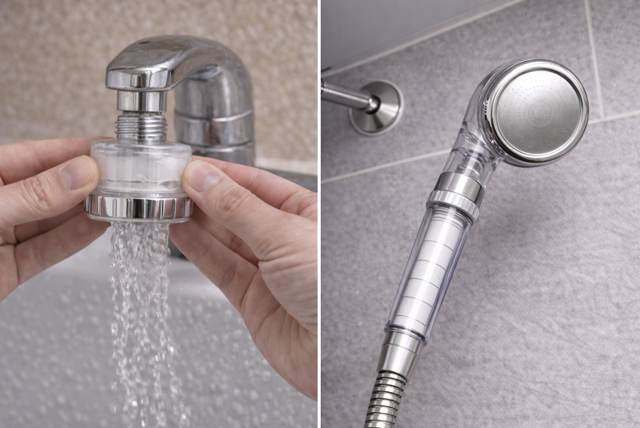
✅ Faucet Filter Example: DAISO Washbasin Filter Set

One common option available at DAISO is a washbasin faucet filter set, typically priced at ₩5,000 (about $3.75).
These sets usually include:
- a faucet filter head
- replacement filter cartridges
- several faucet adapters
- a small wrench tool for installation
The adapters are included because sink faucets can have slightly different thread sizes, and the correct adapter helps the filter fit securely.
This type of filter is designed to trap small particles such as rust or debris that may occasionally come through older plumbing systems.
Installation usually takes only a few minutes and does not require any special tools beyond what is included in the package.
🔍 How to Install a Faucet Filter (Step-by-Step)
Installing a faucet filter is a simple process.
1️⃣ Step 1 — Remove the Existing Faucet Aerator
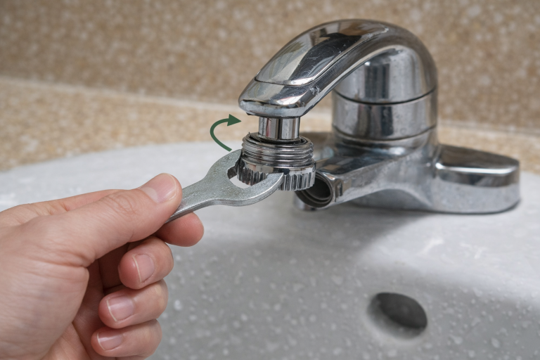
At the end of most sink faucets there is a small piece called an aerator.
This part controls how water flows from the faucet.
In many cases it can be unscrewed by hand, but if it is tight, you can use the small wrench included in the filter set.
2️⃣ Step 2 — Choose the Correct Adapter
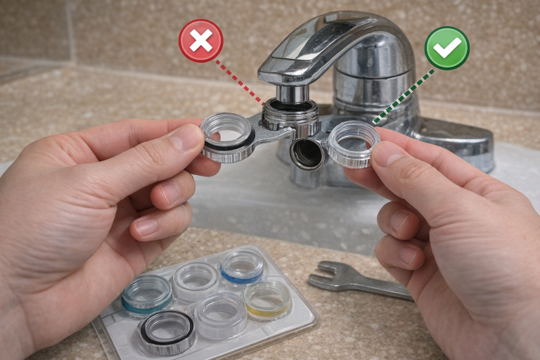
Once the aerator is removed, compare the faucet opening with the adapters included in the filter package.
Select the adapter that fits the faucet threads properly.
This step is important because faucet sizes can vary slightly between sinks.
3️⃣ Step 3 — Attach the Filter to the Faucet

After the correct adapter is selected, simply screw the filter head onto the faucet.
Make sure it is tightened enough to prevent leaks, but avoid over-tightening.
Once installed, turn on the water and check that the water flows normally through the filter.
🔍 When to Replace the Filter
Like most basic filters, the cartridge will eventually need to be replaced.
Many people replace faucet filters every few months, depending on how often the sink is used.
If you notice reduced water flow or visible discoloration in the filter, it may be time to change the cartridge.
Replacement filters are often available at DAISO or other household stores.
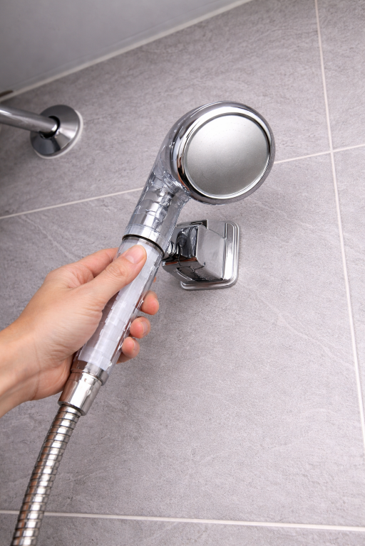
✅ Shower Filter Example: DAISO Filter Shower Head

If you have finished installing the faucet filter, the next upgrade you can consider is installing a filtered shower head.
In many USFK barracks bathrooms, the shower setup looks similar to the example shown above — a fixed wall-mounted shower head without a hose.
To use a filter shower head, you will first need to convert the shower to a hose-style shower setup.
Fortunately, everything needed for this upgrade can be found at DAISO for a very low cost.
🔍 What You Need (All Available at DAISO)
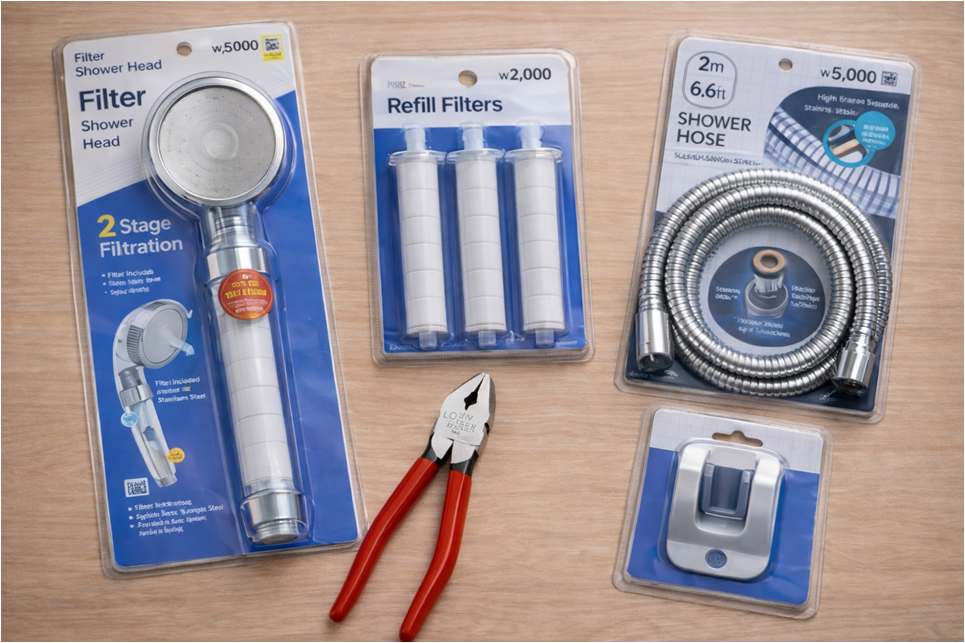
To install a filtered shower setup like this, you will typically need five items.
📌 Filter Shower Head
Price: around ₩5,000 (about $3.75)
This replaces the existing shower head and contains the filter cartridge inside the handle.
📌 Refill Filters
Price: around ₩2,000 (about $1.50)
These cartridges are inserted inside the shower head and replaced periodically.
📌 Shower Hose
Price: around ₩3,000–₩5,000 ($2.25–$3.75)
Because many barracks showers do not come with a hose, this allows the filter shower head to connect to the wall pipe.
📌 Shower Holder (Wall Mount)
Price: around ₩2,000–₩3,000 ($1.50–$2.25)
This attaches to the wall and allows the shower head to be held in place when not in use.
📌 Pliers (Required — Do NOT use an Adjustable Wrench)
Price: around ₩3,000–₩5,000 ($2.25–$3.75)
Do NOT use an adjustable wrench (monkey wrench) for this. It will not work.
Instead, you need a pair of pliers, which you can easily find at DAISO.
The metal fittings on barracks shower pipes are often too tight and have shapes that adjustable wrenches cannot grip properly.
Pliers provide a much stronger and more secure grip, making it possible to loosen the original shower head and tighten the hose connection correctly.
Using the wrong tool can result in slipping, damage, or simply being unable to remove the shower head at all.
1️⃣ Step 1 — Remove the Existing Shower Head

First, remove the original fixed shower head from the wall pipe.
In most cases, the shower head can be removed by turning it counterclockwise.
However, because the fittings may be tight, you may need to use the adjustable wrench (monkey wrench) to loosen it.
Once removed, you should see the threaded pipe coming out of the wall.
2️⃣ Step 2 — Attach the Shower Hose

Next, connect the shower hose to the exposed wall pipe.
To do this:
1. Align the hose connector with the pipe threads
2. Turn it clockwise by hand
3. Tighten slightly with the adjustable wrench if necessary
Make sure the connection is secure, but avoid overtightening.
3️⃣ Step 3 — Attach the Filter Shower Head

Next, screw the filtered shower head onto the other end of the shower hose.
This is usually done by:
1. Aligning the threads
2. Turning the shower head clockwise
3. Tightening by hand
Because most shower connections use a standard thread size, this step is usually very simple.
4️⃣ Step 4 — Install the Shower Holder
Finally, install the shower holder on the wall so the shower head can be placed securely.
Most DAISO holders use adhesive backing or a simple mounting plate, allowing them to be attached without drilling.
Once installed, the shower head can be placed on the holder just like a typical handheld shower.
5️⃣ Step 5 — Check the Installation
After everything is installed, turn on the water and check that:
- the hose connections are secure
- there are no leaks around the fittings
- water flows normally through the filter shower head
⚠️ Important: When connecting the hose to the exposed pipe (after removing the original shower head), do NOT rely on hand-tightening only. If you only tighten it by hand, water will leak from the connection point when you turn the water on. Make sure to use pliers to firmly tighten the connection. This step is essential to prevent leaks and ensure a proper seal.
Once everything looks good, the installation is complete.
🔍 How Often Should You Replace the Shower Filter?
Like most small water filters, the shower filter cartridge should be replaced periodically.
A common guideline is to replace the filter every 2–3 months, depending on how often the shower is used.
In some cases, you may notice the filter turning slightly brown or yellow over time.
This usually happens when the filter collects small particles such as sediment or rust from the pipes.
If the filter becomes noticeably discolored or if the water pressure begins to decrease slightly, it is usually a good time to replace the cartridge with a new refill filter.
Because refill cartridges at DAISO typically cost around ₩2,000 (about $1.50), maintaining the filter is inexpensive and easy.